 Feed Me
Step 01
Preheat the oven to 180C/350F. Grease and line 4 x 20cm round cake pans with baking paper, baking in batches if you only have 2 pans.
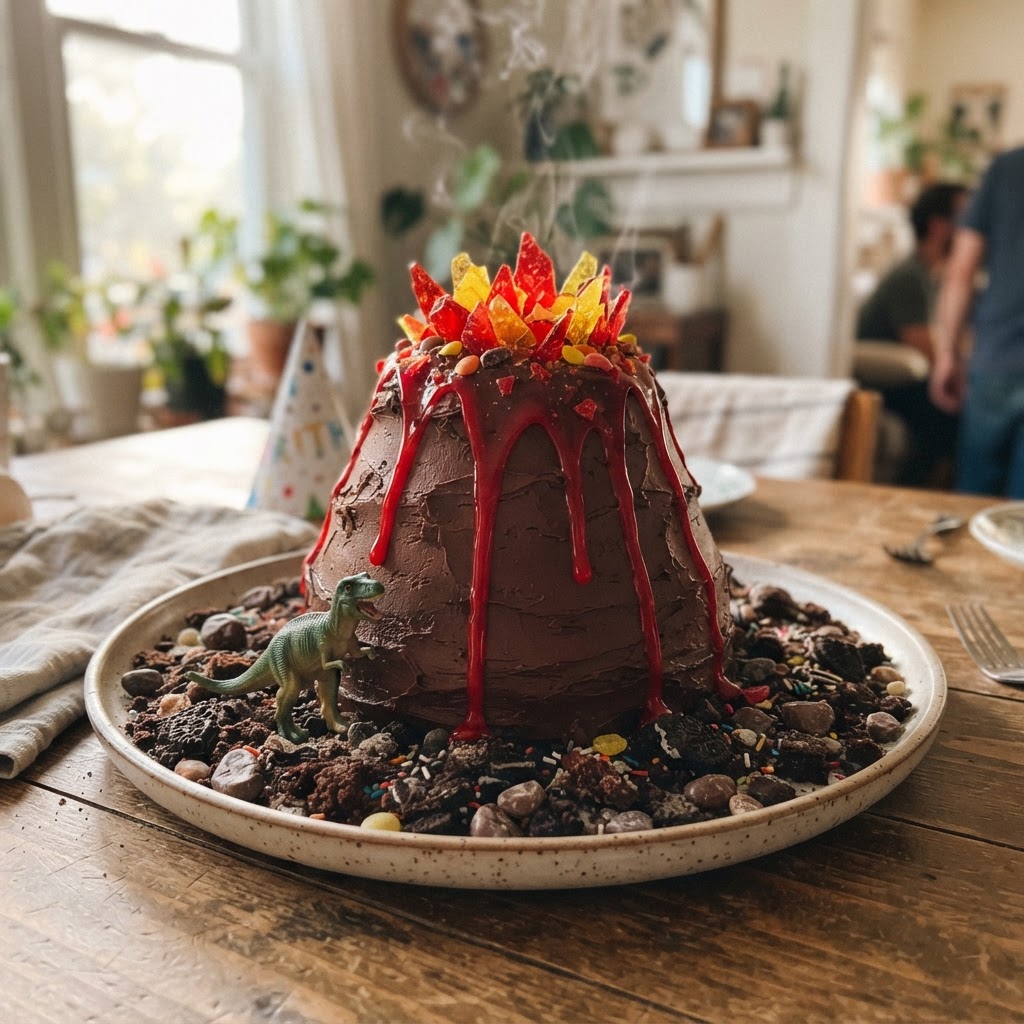
This show-stopping volcano cake is perfect for a birthday party. Your guests will be in awe when you add dry ice and water to the mason jar hidden inside the cake. There are several steps that go into making this masterpiece, so save time by using box cake mix and store-bought frosting/icing.
Preparation Lab
Step 01
Preheat the oven to 180C/350F. Grease and line 4 x 20cm round cake pans with baking paper, baking in batches if you only have 2 pans.
Step 02
Colour the batter: add 4 teaspoons of red food colouring to one bowl, the remaining red and 1 teaspoon of yellow to the next, and the remaining 2 teaspoons of yellow to the last. Pour ½ cup of each colour into each pan, alternating colours, until all the batter is used, then gently swirl a toothpick through each pan to blend.
Step 03
Bake for 25-40 minutes until a toothpick inserted in the centre comes out clean. Cool completely and keep the oven on.
Step 04
Make the sweets decorations: grease 3 baking sheets and line with baking paper.
Step 05
For the flames, arrange 12 red sweets in 4 rows of 3 on one side of a sheet and 9 butterscotch sweets in 3 rows of 3 on the other. Bake for 4-6 minutes until melted together then cool completely and break into large shards.
Step 06
For the lava and water puddles, arrange 4 clusters of 3 blue and 1 green sweet on a sheet with 4 red sweets, each beside a remaining butterscotch sweet, at least 2½cm apart. Bake for 4-6 minutes until melted into pools then cool completely.
Step 07
For the lava drips, position the remaining 8 red sweets along a long edge of a sheet and bake for 4-6 minutes until melted, then carefully tip the pan so the melted sweets slide down into drips. Cool completely.
Step 08
Trim the domed tops off the cakes then use the 7cm cutter to punch holes in the centres of 2 cakes, reserving the scraps.
Step 09
Assemble: spread a dab of frosting/icing on a 22cm cake round on a turntable and stack the 4 cakes with ½ cup frosting/icing between each, with the 2 hole cakes on top. Push the mason jar into the centre hole until level with the cake. Refrigerate for at least 20 minutes.
Step 10
Carve the volcano: trim the sides of the cake at an angle with a serrated knife so the base is wider than the top, leaving at least 2½cm of cake around the jar. Reserve the scraps.
Step 11
Frost the outside of the cake with 4 cups of frosting/icing then refrigerate for at least 20 minutes, or overnight.
Step 12
Make the volcanic crumbles: mix 2 cups of frosting/icing into the bowl of cake scraps with an electric hand mixer until coarsely crumbled.
Step 13
Transfer the cake to a platter at least 30cm wide, near one corner. Add the blue-green candy puddles around the edges, then pile the volcanic crumble around the base, partially covering the puddles.
Step 14
Sprinkle the chocolate peanut butter cups, mini cups and caramel bites evenly over the crumble. Place the red sweets drips down the sides near the top with the red puddles beneath them, then stand the red and yellow shards along the top rim around the mason jar.
Step 15
Position the dinosaur figurines around the volcano, if using.
Step 16
To present, use tongs to place a piece of dry ice in the mason jar and pour room-temperature water over it to create the smoke effect.
Step 17
Remove the mason jar with tongs before slicing, then serve and enjoy!
Community Tips
to share your tips and recommendations.
No tips yet
Be the first to share your cooking experience.
Community
Premium Feature
Upgrade to Premium to rate recipes, leave reviews, and see what other home cooks are saying.
Select any allergens you need to avoid. Matching recipes will be flagged and blocked from your weekly plan. ⚠️ Disclaimer: It is your responsibility to tell us your allergens, and the final decision on what you consume is always yours.